> ## Documentation Index
> Fetch the complete documentation index at: https://restate-6d46e1dc-cloud-docs.mintlify.site/llms.txt
> Use this file to discover all available pages before exploring further.

# Cloudflare Workers

> Run your TypeScript services on Cloudflare Workers

Deploy your Restate services on Cloudflare Workers.
This guide covers project configuration, service registration, and security setup.

<Tip>
  Follow the [quickstart](/quickstart#cloudflare-workers) to try Cloudflare Workers and Restate locally.
</Tip>

## Deploying to Cloudflare Workers

<Steps titleSize="h3">
  <Step title={"Set up your project"}>
    <Tabs>
      <Tab title="New project">
        Start with the [cloudflare-workers-template](https://github.com/restatedev/cloudflare-workers-template) and follow its README.

        <Card icon="github" href="https://github.com/new?template_name=cloudflare-workers-template&template_owner=restatedev" arrow="true" horizontal>Create your Restate + CloudFlare workers repository</Card>
      </Tab>

      <Tab title="Existing Cloudflare Workers project">
        Import the Restate SDK with the `fetch` component:

        ```typescript theme={null}
        import * as restate from "@restatedev/restate-sdk-cloudflare-workers/fetch";

        // Export the Restate handler
        export default {
            fetch: restate.createEndpointHandler({ services: [greeter] })
        };
        ```

        Make sure your `wrangler.toml` sets the `nodejs_compat` flag and enables preview urls:

        ```toml {"CODE_LOAD::https://raw.githubusercontent.com/restatedev/examples/refs/heads/main/typescript/templates/cloudflare-worker/wrangler.toml"}  theme={null}
        # The name of your Cloudflare Worker project
        name = "restate-cloudflare-worker"

        # Entrypoint
        main = "./src/index.ts"

        # Preview URLs are used to register to Restate
        preview_urls = true

        # Enable NodeJS compatibility (used by the SDK for the Node Buffer API)
        # and Node's process.env (for logging)
        compatibility_date = "2026-02-20"
        compatibility_flags = [ "nodejs_compat" ]
        ```
      </Tab>
    </Tabs>

    <Accordion title="Develop locally">
      A Workers dev server can be started on port 9080 using:

      ```shell theme={null}
      npm install
      npx wrangler dev --port 9080
      ```

      Register the service with Restate:

      ```shell theme={null}
      npx @restatedev/restate deployments register --use-http1.1 http://localhost:9080
      ```

      <Note>
        `wrangler` only supports HTTP/1.1 when running locally, so the `--use-http1.1` flag is required. This flag is not needed when deploying to Cloudflare Workers.
      </Note>
    </Accordion>
  </Step>

  <Step title={"Secure your service with request identity validation"}>
    Cloudflare Workers are public HTTP endpoints. Secure your service with request identity validation so that it only accepts requests from the Restate environment you trust.

    <Tabs>
      <Tab title={"Restate Cloud / BYOC"} icon={"/logo/restate-cloud-mini.svg"}>
        Restate Cloud and BYOC environments create and manage the request identity key for you.

        Copy the environment's public key from [**Developers > Security > HTTP endpoints**](https://cloud.restate.dev/to/developers/integration#http-endpoints) in the Restate Cloud UI.
      </Tab>

      <Tab title={"Restate OSS"} icon={"/logo/restate-mini.svg"}>
        Request identity uses an ED25519 key pair. Give the private key to Restate so it can sign requests, and give the public key to your services so they can verify those signatures.

        Choose one of the following ways to generate the keys:

        <AccordionGroup>
          <Accordion title="Option 1: Let Restate output the public key">
            1. Generate the private key:

            ```bash theme={null}
            openssl genpkey -algorithm ed25519 -outform pem -out private.pem
            ```

            2. Provide its path to Restate on startup:

            ```bash theme={null}
            export RESTATE_REQUEST_IDENTITY_PRIVATE_KEY_PEM_FILE=private.pem
            ```

            3. Start Restate and copy the corresponding public key from the startup log. Restate prints it in the compact format expected by the SDK:

            ```log theme={null}
            INFO restate_service_client::request_identity::v1
            Loaded request identity key
            kid: "publickeyv1_w7YHemBctH5Ck2nQRQ47iBBqhNHy4FV7t2Usbye2A6f"
            path: private.pem
            ```
          </Accordion>

          <Accordion title="Option 2: Generate both key files beforehand">
            Run this script to generate `private.pem` and write the corresponding `publickeyv1_...` value to a `public-key` file before starting Restate:

            <Tabs sync={false}>
              <Tab title="macOS" icon="apple">
                Install OpenSSL 3 with Homebrew, then run the script:

                ```bash theme={null}
                brew install openssl@3
                ```

                ```shell expandable generate.sh theme={null}
                #!/usr/bin/env bash
                set -euo pipefail

                openssl_bin="$(brew --prefix openssl@3)/bin/openssl"

                # generate private key
                "$openssl_bin" genpkey -algorithm ed25519 -outform pem -out private.pem
                echo "Wrote private key to private.pem"

                # encode public key
                encoded=$("$openssl_bin" pkey -in private.pem -pubout -outform DER 2>/dev/null |
                tail -c +13 |
                od -An -v -tu1 |
                awk '
                BEGIN {
                  alphabet = "123456789ABCDEFGHJKLMNPQRSTUVWXYZabcdefghijkmnopqrstuvwxyz"
                  leading = 1
                }
                {
                  for (i = 1; i <= NF; i++) {
                    byte = $i
                    if (leading && byte == 0) {
                      zeroes++
                      continue
                    }
                    leading = 0
                    carry = byte
                    for (j = 0; j < digit_count; j++) {
                      carry += digits[j] * 256
                      digits[j] = carry % 58
                      carry = int(carry / 58)
                    }
                    while (carry > 0) {
                      digits[digit_count++] = carry % 58
                      carry = int(carry / 58)
                    }
                  }
                }
                END {
                  for (i = 0; i < zeroes; i++) printf "1"
                  for (i = digit_count - 1; i >= 0; i--) {
                    printf "%s", substr(alphabet, digits[i] + 1, 1)
                  }
                }')

                echo -n "publickeyv1_${encoded}" > public-key
                echo "Wrote publickeyv1_${encoded} to public-key"
                ```
              </Tab>

              <Tab title="Linux" icon="linux">
                This script requires Bash, OpenSSL, `awk`, and GNU Coreutils:

                ```shell expandable generate.sh theme={null}
                #!/usr/bin/env bash
                set -euo pipefail

                # generate private key
                openssl genpkey -algorithm ed25519 -outform pem -out private.pem
                echo "Wrote private key to private.pem"

                base58_chars="123456789ABCDEFGHJKLMNPQRSTUVWXYZabcdefghijkmnopqrstuvwxyz"
                # encode public key
                encoded=$(openssl ec -in private.pem -inform pem -pubout -outform der -out /dev/stdout 2>/dev/null |
                tail -c +13 |
                basenc --base16 "${1:-/dev/stdin}" -w0 |
                if
                read
                [[ $REPLY =~ ^((00)*)(([[:xdigit:]]{2})*) ]]
                echo -n "${BASH_REMATCH[1]//00/1}" # leading 0s -> 1
                (( ${#BASH_REMATCH[3]} > 0 ))
                then
                dc -e "16i0${BASH_REMATCH[3]^^} Ai[58~rd0<x]dsxx+f" | # hex bytes to indexes into the char string
                while read -r
                do echo -n "${base58_chars:REPLY:1}"
                done
                fi)

                echo -n "publickeyv1_${encoded}" > public-key
                echo "Wrote publickeyv1_${encoded} to public-key"
                ```
              </Tab>
            </Tabs>
          </Accordion>
        </AccordionGroup>
      </Tab>
    </Tabs>

    Configure the key in your Restate SDK endpoint before deploying.

    ```typescript {"CODE_LOAD::ts/src/develop/serving_identity_serverless.ts#identity"} theme={null}
    const handler = restate.createEndpointHandler({
      services: [myService],
      identityKeys: ["publickeyv1_w7YHemBctH5Ck2nQRQ47iBBqhNHy4FV7t2Usbye2A6f"],
    });
    ```

    The public key is not secret, so it is safe to include it directly in your service source code or configuration files.
  </Step>

  <Step title={"Deploy your Worker"}>
    Deploy the Worker after configuring request identity validation:

    ```shell theme={null}
    npm install
    npx wrangler deploy
    ```
  </Step>

  <Step title={"Register the service to Restate"}>
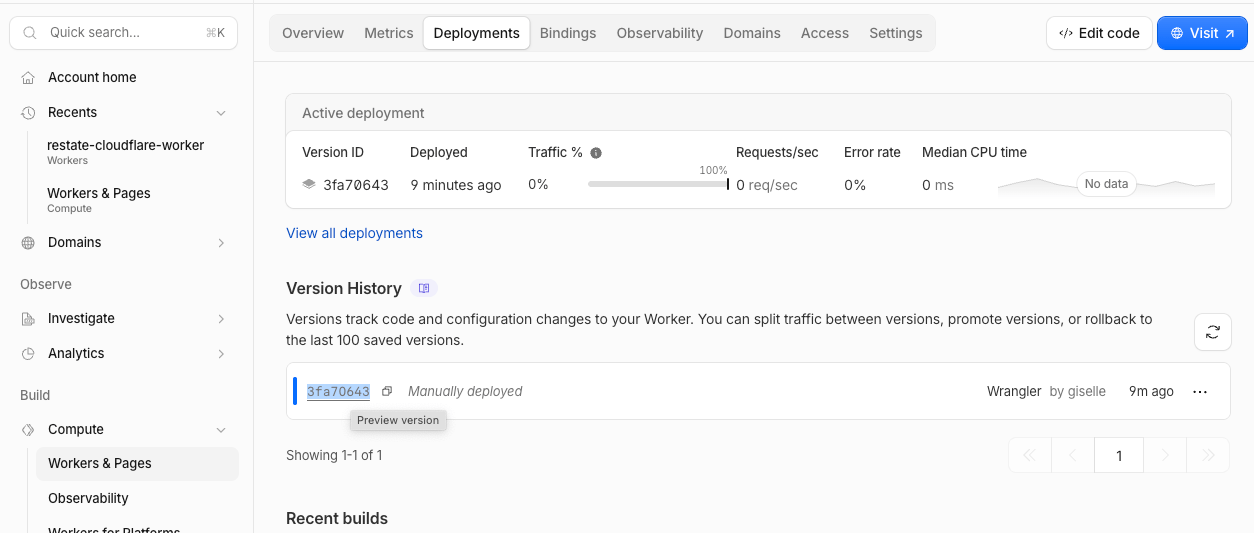
    After deploying to Cloudflare Workers, use [Preview URLs](https://developers.cloudflare.com/workers/configuration/previews/) so Restate can target specific [service versions](/services/versioning).
    Copy the url of the version, as highlighted here:

    <Frame>
      <img src="https://mintcdn.com/restate-6d46e1dc-cloud-docs/gyeA88vEecWsxlVJ/img/services/deploy/cloudflare-preview-url.png?fit=max&auto=format&n=gyeA88vEecWsxlVJ&q=85&s=fa31550048fd000857e43f1680f9755d" alt="Cloudflare Preview URL" width="1254" height="533" data-path="img/services/deploy/cloudflare-preview-url.png" />
    </Frame>

    <div className="hidden-tabs">
      <Tabs>
        <Tab title={"Restate Cloud / BYOC"} icon={"/logo/restate-cloud-mini.svg"}>
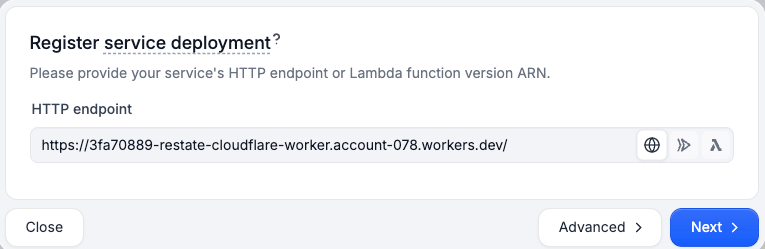
          Register the service with Restate [via the UI](https://cloud.restate.dev/to/overview?register-deployment=true):
        </Tab>

        <Tab title={"Restate OSS"} icon={"/logo/restate-mini.svg"}>
          Register the service with Restate [via the UI](http://localhost:9070/ui/overview?register-deployment=true):
        </Tab>
      </Tabs>
    </div>

    <Frame>
      <img src="https://mintcdn.com/restate-6d46e1dc-cloud-docs/gyeA88vEecWsxlVJ/img/services/deploy/cloudflare-register-url.png?fit=max&auto=format&n=gyeA88vEecWsxlVJ&q=85&s=80f90405cd249869e3594ada1603d3bc" alt="Cloudflare Registration" width="765" height="249" data-path="img/services/deploy/cloudflare-register-url.png" />
    </Frame>

    Or register the service with the CLI:

    ```shell theme={null}
    npx @restatedev/restate deployments register \
      https://<VERSION_PREFIX OR ALIAS>-<WORKER_NAME>.<SUBDOMAIN>.workers.dev
    ```
  </Step>

  <Step title={"Send your first request"}>
    <div className="hidden-tabs">
      <Tabs>
        <Tab title={"Restate Cloud / BYOC"} icon={"/logo/restate-cloud-mini.svg"}>
          You're set up! Go to the [Overview page > Greeter > Playground](https://cloud.restate.dev/to/overview?servicePlayground=Greeter#/operations/greet) and start sending requests to your service.
        </Tab>

        <Tab title={"Restate OSS"} icon={"/logo/restate-mini.svg"}>
          You're set up! Go to the [Overview page > Greeter > Playground](http://localhost:9070/ui/overview?servicePlayground=Greeter#/operations/greet) and start sending requests to your service.
        </Tab>
      </Tabs>
    </div>

    Send `{"name": "Alice"}` as the request body to the service.
  </Step>
</Steps>

## CI/CD Automation

To automatically deploy to Cloudflare Workers on each git commit to `main` and automatically register new [Restate service versions](/services/versioning):

<Tip>
  If you've followed the steps above, then you already have the GitHub Actions workflow set up. All you need to do is to add the secrets below to your project.
</Tip>

<Note>
  Make sure your Cloudflare Worker project exists before the first workflow run. If it does not, create it with `npx wrangler deploy`.
</Note>

<Tabs>
  <Tab title={"Restate Cloud / BYOC"} icon={"/logo/restate-cloud-mini.svg"}>
    ```yml {"CODE_LOAD::https://raw.githubusercontent.com/restatedev/cloudflare-workers-template/refs/heads/main/.github/workflows/deploy.yml?remove_comments"}  theme={null}
    name: Deploy Worker
    on:
      push:
        branches:
          - main
    jobs:
      deploy:
        runs-on: ubuntu-latest
        timeout-minutes: 60
        steps:
          - uses: actions/checkout@v4
          - uses: actions/setup-node@v5
          - run: npm ci

          - name: Build & Deploy Worker
            uses: cloudflare/wrangler-action@v3
            id: deploy
            with:
              apiToken: ${{ secrets.CLOUDFLARE_API_TOKEN }}
              accountId: ${{ secrets.CLOUDFLARE_ACCOUNT_ID }}
              command: versions upload --message "Deployed via GitHub Actions - commit ${{ github.sha }}"
          - name: Get deployment URL
            id: get-url
            env:
              WRANGLER_OUTPUT: ${{ steps.deploy.outputs.command-output }}
            run: |
              URL=$(echo "$WRANGLER_OUTPUT" | awk '/Version Preview URL:/ {gsub(/.*Version Preview URL: /, ""); print}')
              echo "deployment-url=$URL" >> $GITHUB_OUTPUT

          - name: Register Restate deployment
            env:
              RESTATE_ADMIN_URL: ${{ secrets.RESTATE_ADMIN_URL }}
              RESTATE_AUTH_TOKEN: ${{ secrets.RESTATE_AUTH_TOKEN }}
            run: npx -y @restatedev/restate deployment register -y ${{ steps.get-url.outputs.deployment-url }}
    ```

    This workflow needs the following [**GitHub Actions repository secrets**](https://docs.github.com/en/actions/how-tos/write-workflows/choose-what-workflows-do/use-secrets):

    * `CLOUDFLARE_ACCOUNT_ID`: Your Cloudflare Account. To get your account id, check [https://developers.cloudflare.com/workers/ci-cd/external-cicd/github-actions/#cloudflare-account-id](https://developers.cloudflare.com/workers/ci-cd/external-cicd/github-actions/#cloudflare-account-id)
    * `CLOUDFLARE_API_TOKEN`: Your Cloudflare API token. To get a token, check [https://developers.cloudflare.com/workers/ci-cd/external-cicd/github-actions/](https://developers.cloudflare.com/workers/ci-cd/external-cicd/github-actions/)
    * `RESTATE_ADMIN_URL`: The Admin URL. You can find it in [Developers > Admin URL](https://cloud.restate.dev/to/developers/integration#admin)
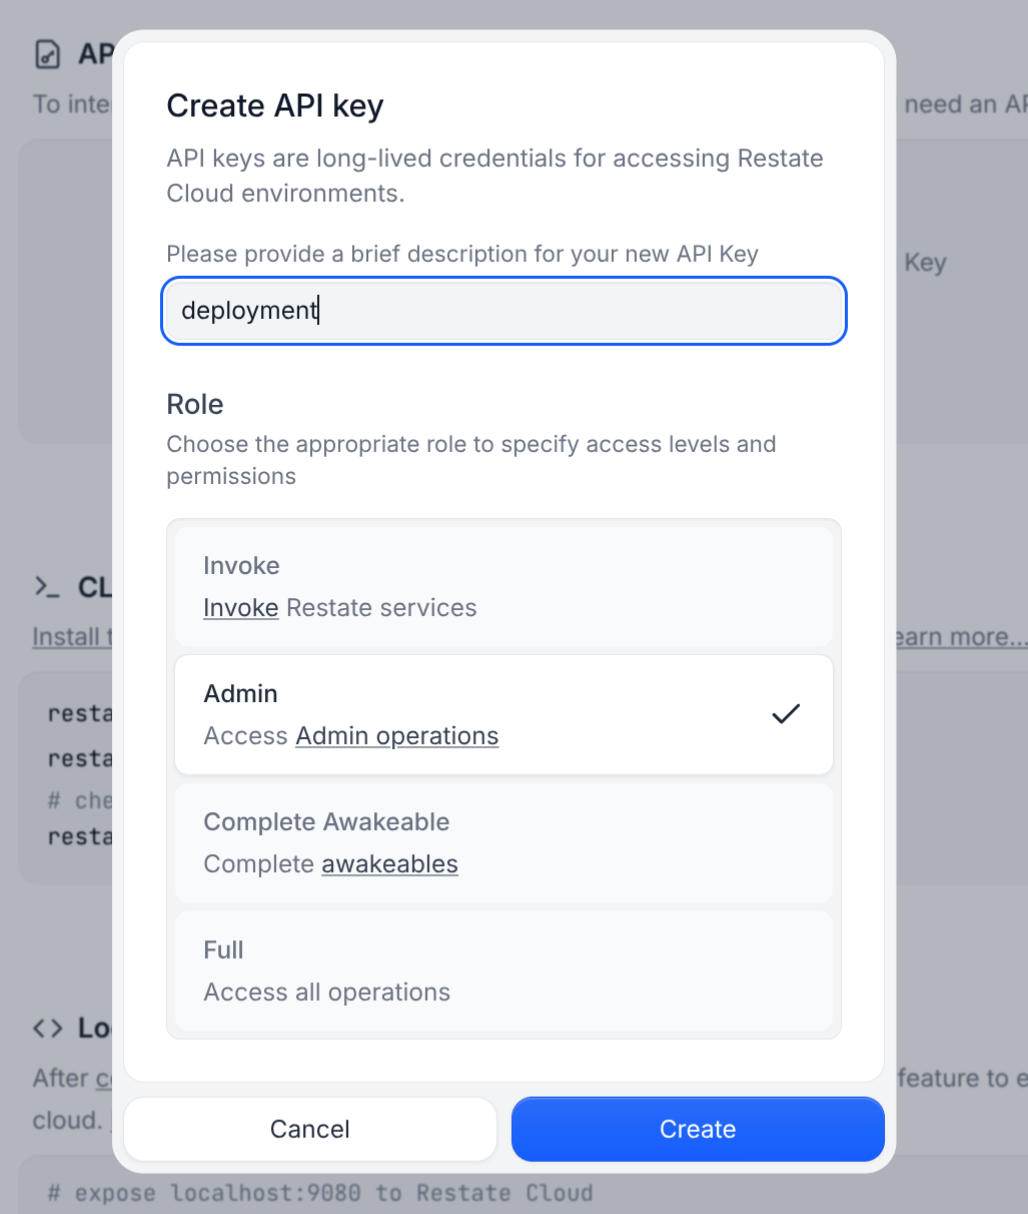
    * `RESTATE_AUTH_TOKEN`: Your Restate Cloud or BYOC auth token. To get one, go to [Developers > API Keys > Create API Key](https://cloud.restate.dev/to/developers/integration?createApiKey=true\&createApiKeyDescription=deployment-key\&createApiKeyRole=rst:role::AdminAccess), and make sure to select **Admin** for the role

    <Accordion title="View">
      <img src="https://mintcdn.com/restate-6d46e1dc-cloud-docs/G3yDE3RlKqX3D28h/img/services/deploy/deployment-token.png?fit=max&auto=format&n=G3yDE3RlKqX3D28h&q=85&s=3d8be70409f93176212839564318d8d8" alt="Token setup" width="50%" data-path="img/services/deploy/deployment-token.png" />
    </Accordion>
  </Tab>

  <Tab title={"Restate OSS"} icon={"/logo/restate-mini.svg"}>
    ```yml {"CODE_LOAD::https://raw.githubusercontent.com/restatedev/cloudflare-workers-template/refs/heads/main/.github/workflows/deploy.yml?remove_comments"}  theme={null}
    name: Deploy Worker
    on:
      push:
        branches:
          - main
    jobs:
      deploy:
        runs-on: ubuntu-latest
        timeout-minutes: 60
        steps:
          - uses: actions/checkout@v4
          - uses: actions/setup-node@v5
          - run: npm ci

          - name: Build & Deploy Worker
            uses: cloudflare/wrangler-action@v3
            id: deploy
            with:
              apiToken: ${{ secrets.CLOUDFLARE_API_TOKEN }}
              accountId: ${{ secrets.CLOUDFLARE_ACCOUNT_ID }}
              command: versions upload --message "Deployed via GitHub Actions - commit ${{ github.sha }}"
          - name: Get deployment URL
            id: get-url
            env:
              WRANGLER_OUTPUT: ${{ steps.deploy.outputs.command-output }}
            run: |
              URL=$(echo "$WRANGLER_OUTPUT" | awk '/Version Preview URL:/ {gsub(/.*Version Preview URL: /, ""); print}')
              echo "deployment-url=$URL" >> $GITHUB_OUTPUT

          - name: Register Restate deployment
            env:
              RESTATE_ADMIN_URL: ${{ secrets.RESTATE_ADMIN_URL }}
              RESTATE_AUTH_TOKEN: ${{ secrets.RESTATE_AUTH_TOKEN }}
            run: npx -y @restatedev/restate deployment register -y ${{ steps.get-url.outputs.deployment-url }}
    ```

    This workflow needs the following [**GitHub Actions repository secrets**](https://docs.github.com/en/actions/how-tos/write-workflows/choose-what-workflows-do/use-secrets):

    * `CLOUDFLARE_ACCOUNT_ID`: Your Cloudflare Account. To get your account id, check [https://developers.cloudflare.com/workers/ci-cd/external-cicd/github-actions/#cloudflare-account-id](https://developers.cloudflare.com/workers/ci-cd/external-cicd/github-actions/#cloudflare-account-id)
    * `CLOUDFLARE_API_TOKEN`: Your Cloudflare API token. To get a token, check [https://developers.cloudflare.com/workers/ci-cd/external-cicd/github-actions/](https://developers.cloudflare.com/workers/ci-cd/external-cicd/github-actions/)
    * `RESTATE_ADMIN_URL`: The URL through which GitHub Actions can reach your Restate Admin API
    * `RESTATE_AUTH_TOKEN`: Set this token if GitHub Actions reaches the Admin API through a reverse proxy that accepts bearer token authentication
  </Tab>
</Tabs>
